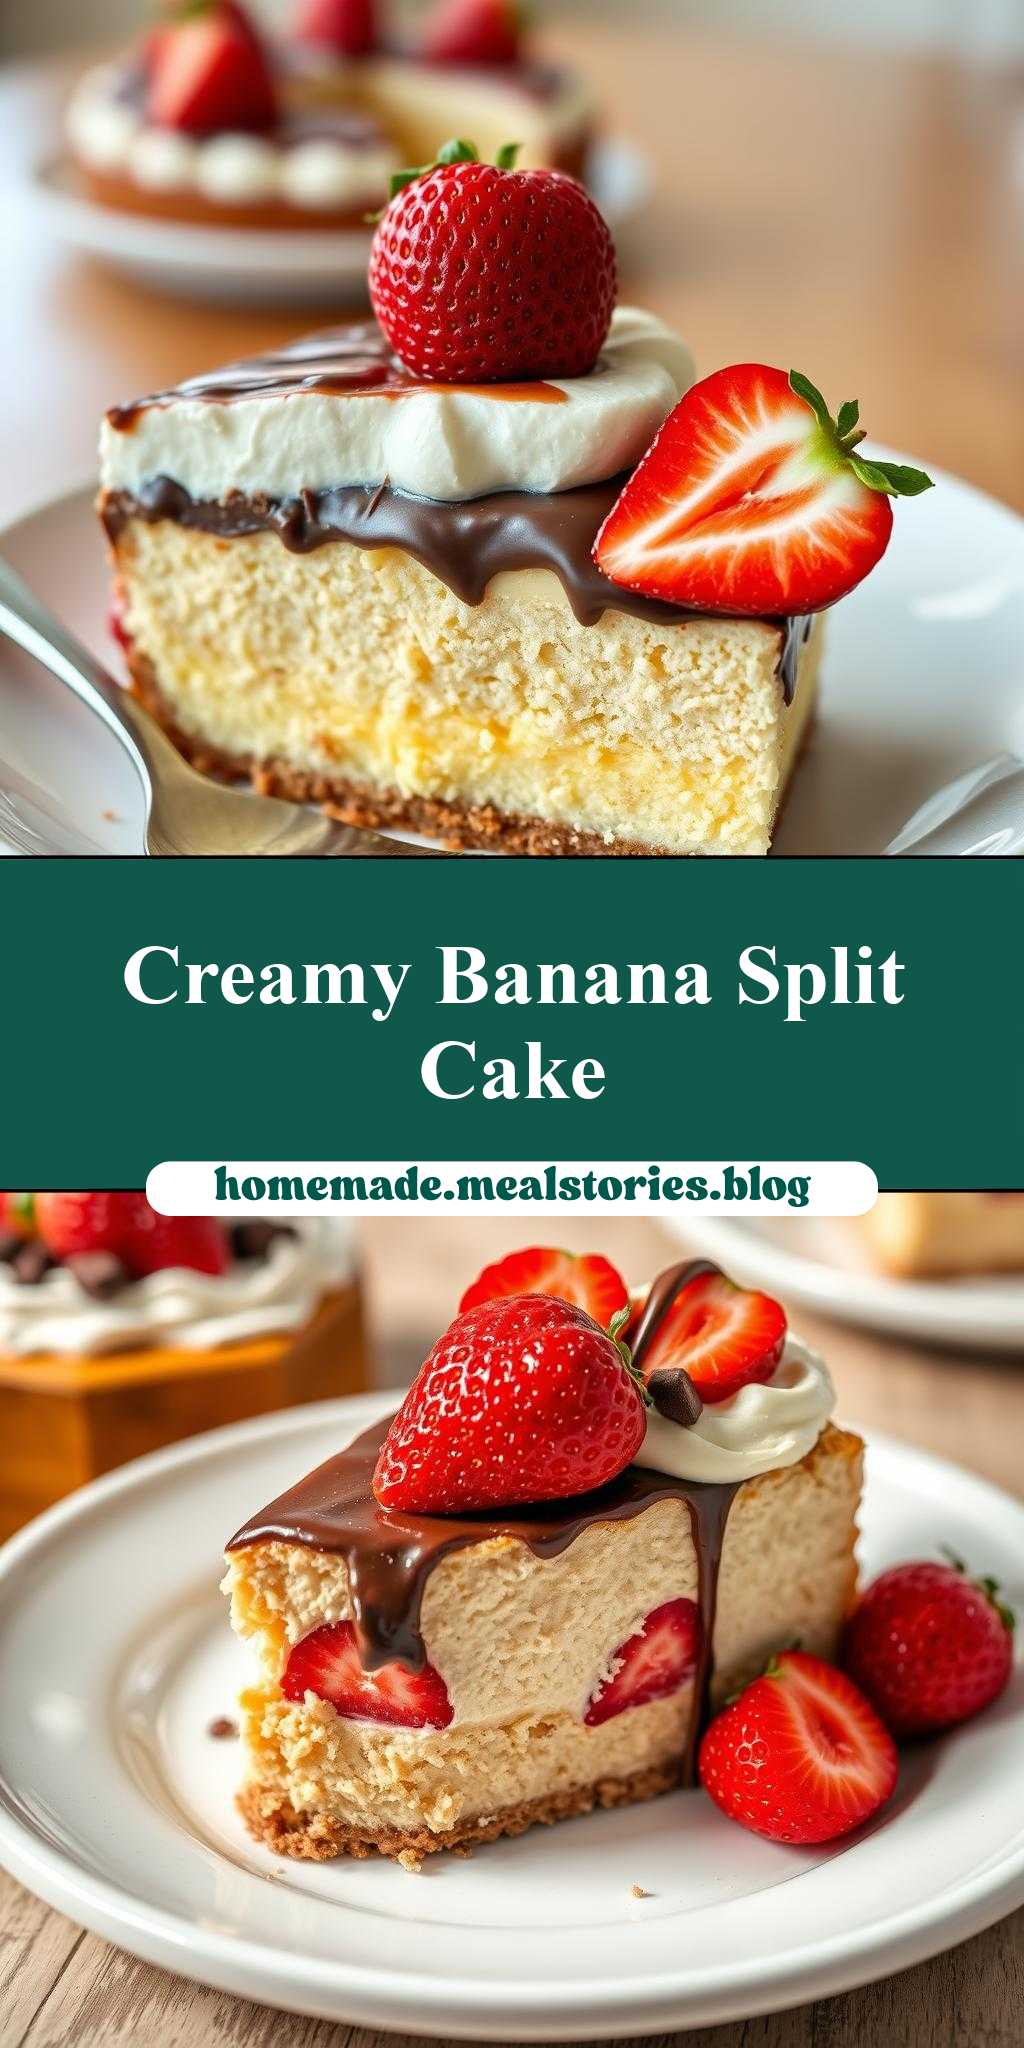
What happens when a classic banana split meets decadent cheesecake? Pure magic. Rich chocolate and fresh strawberries atop a creamy homemade cheesecake cake make for an easy yet impressive family favorite dessert. Save this idea for your next special occasion treat.
two pictures of a banana split cheesecake cake with chocolate and strawberries on top
Introduction
Imagine a dessert that combines the classic appeal of a banana split with the creamy richness of cheesecake, all wrapped up in a stunning cake that’s almost too beautiful to eat. Almost. This banana split cheesecake cake is a masterpiece of flavors and textures, featuring a moist cake base, a velvety cheesecake layer, and topped with the quintessential banana split ingredients: chocolate, strawberries, whipped cream, and chopped nuts. The best part? It’s surprisingly easy to make, using everyday ingredients and requiring minimal specialized equipment. Whether you’re a seasoned baker or a novice in the kitchen, this show-stopping dessert is sure to impress your family and friends, and it’s perfect for any occasion, from birthdays to holiday gatherings.
Why This Works
- Flavor balance and ingredient accessibility: The combination of a classic cake, creamy cheesecake, and the iconic toppings of a banana split creates a flavor profile that’s both familiar and exciting. Plus, the ingredients are easy to find in most grocery stores, making it simple to whip up this dessert at a moment’s notice.
- Ease of preparation: Despite its impressive appearance, this cake is relatively straightforward to prepare. The cake and cheesecake layers can be made ahead of time, and the toppings are easy to assemble just before serving.
- Impressive results with minimal effort: The real magic of this dessert lies in its presentation. With just a few simple toppings, you can transform a humble cake into a stunning centerpiece that’s sure to be the talk of the party. And the best part? It requires minimal decorating skills, so anyone can achieve professional-looking results.
Key Ingredients
The star of the show is, of course, the banana split cheesecake cake itself, which consists of a moist cake layer and a creamy cheesecake layer. The cake is made with basic ingredients like flour, sugar, eggs, and butter, while the cheesecake layer requires cream cheese, sour cream, eggs, and sugar. For the toppings, you’ll need sliced bananas, strawberries, chocolate sauce, whipped cream, and chopped nuts. Feel free to get creative with your toppings – other options might include caramel sauce, marshmallows, or even candy pieces. And if you’re looking for substitutions, consider using different types of fruit or nuts to change up the flavor and texture.
Instructions
- Step 1: Begin by preheating your oven to 350°F (180°C). Prepare your cake pans by greasing them and lining the bottoms with parchment paper. In a medium bowl, whisk together flour, sugar, and baking powder, then set aside. In a large bowl, use an electric mixer to beat together butter and eggs until light and fluffy, then gradually add the dry ingredients, mixing until just combined.
- Step 2: Divide the cake batter evenly between the prepared pans and smooth the tops. Bake for 25-30 minutes, or until a toothpick inserted into the center of each cake comes out clean. Allow the cakes to cool in the pans for 5 minutes, then transfer them to a wire rack to cool completely. While the cakes are baking, prepare the cheesecake layer by beating together cream cheese, sour cream, eggs, and sugar until smooth.
- Step 3: Once the cakes are completely cool, it’s time to assemble the dessert. Place one of the cake layers on a serving plate or cake stand, then spread the cheesecake layer over the top. Add the second cake layer, then refrigerate the cake for at least 30 minutes to allow the flavors to meld. Just before serving, top the cake with sliced bananas, strawberries, chocolate sauce, whipped cream, and chopped nuts.
- Step 4: The final touches are all about presentation. Consider arranging the toppings in a pattern or design, or adding a few extra garnishes like sprinkles or edible flowers. And don’t be afraid to get creative – the beauty of this dessert lies in its customization options, so feel free to make it your own!
Handy Tips
- One of the most important things to keep in mind when making this dessert is to not overmix the batter. This can result in a dense, tough cake that’s more like a brick than a tender treat. To avoid this, mix your ingredients just until they come together in a shaggy mass, then stop mixing – the batter will come together as it bakes.
- Another tip is to make sure your ingredients are at room temperature before you start mixing. This will help ensure that your cake and cheesecake layers turn out light and fluffy, rather than dense and flat.
- Finally, don’t be afraid to experiment with different toppings and flavor combinations. This dessert is all about customization, so feel free to get creative and make it your own!
Heat Control
If you’re using a conventional oven to bake your cake, make sure to keep an eye on the temperature and baking time. The ideal temperature for baking cake is between 325°F and 375°F (165°C to 190°C), and the baking time will depend on the size and depth of your cake pans. As a general rule, bake for 25-30 minutes, or until a toothpick inserted into the center of each cake comes out clean. And don’t forget to check your cake frequently during the baking time, as oven temperatures can vary – you may need to adjust the baking time accordingly.
Crunch Factor
The crunch factor is all about texture, and this dessert has it in spades. From the moist, tender cake to the creamy cheesecake layer and the crunchy chopped nuts on top, there’s something for everyone. To achieve the perfect texture, make sure to not overmix your batter, and don’t overbake your cake – this can result in a dry, crumbly texture that’s more like sawdust than a tender treat. And don’t forget to add plenty of toppings, like nuts, sprinkles, or even candy pieces, to give your dessert a fun and playful texture.
Pro Kitchen Tricks
- One of the best tricks for achieving a smooth, even cheesecake layer is to use a water bath. This involves placing your cheesecake pan in a larger pan filled with water, which helps to regulate the temperature and prevent cracking. To use a water bath, simply place your cheesecake pan in a larger pan, then add enough water to come halfway up the sides of the pan. Bake as directed, then remove the cheesecake from the water bath and allow it to cool completely.
- Another trick is to use a kitchen torch to caramelize the sugar on top of your cake. This involves sprinkling a thin layer of sugar over the top of the cake, then using a kitchen torch to caramelize the sugar and create a crunchy, golden-brown crust. To caramelize sugar, simply sprinkle a thin layer over the top of the cake, then hold the kitchen torch about 2-3 inches away from the sugar. Move the torch slowly back and forth, holding it in place for about 10-15 seconds, or until the sugar is golden brown and caramelized.
Storage Tips
- One of the best things about this dessert is that it can be made ahead of time, which makes it perfect for parties and special occasions. To store your cake, simply wrap it tightly in plastic wrap or aluminum foil, then refrigerate for up to 3 days or freeze for up to 2 months. When you’re ready to serve, simply thaw the cake overnight in the refrigerator, then top with your desired toppings and serve.
- Another tip is to use an airtight container to store your cake, which will help to keep it fresh and prevent it from drying out. Consider using a cake keeper or a large plastic container with a tight-fitting lid, and make sure to press the plastic wrap or aluminum foil directly onto the surface of the cake to prevent air from reaching it.
Gift Packaging Ideas
If you’re looking for a unique and thoughtful gift, consider packaging your banana split cheesecake cake in a decorative tin or box. You could also add a few extra touches, like a sprinkle of edible glitter or a handwritten note, to make the gift even more special. And don’t forget to include a few serving utensils, like a cake server and a few forks, to make it easy for the recipient to serve and enjoy their dessert.
Flavor Variations
- Different spices: Consider adding a pinch of cinnamon or nutmeg to your cake batter for a warm, spicy flavor. You could also try adding a teaspoon of vanilla extract or a handful of chocolate chips to give your cake a unique twist.
- Creative toppings: The toppings are where you can really get creative with this dessert, so don’t be afraid to experiment and try new things. Some ideas might include caramel sauce, marshmallows, or even candy pieces – the possibilities are endless!
- Ingredient swaps: If you’re looking for a gluten-free or vegan version of this dessert, consider swapping out the traditional flour for a gluten-free alternative, or using a non-dairy milk and vegan cream cheese. You could also try using different types of sugar, like honey or maple syrup, to give your cake a unique flavor.
Troubleshooting
- Texture problems: If your cake turns out dense or tough, it may be due to overmixing the batter. To avoid this, mix your ingredients just until they come together in a shaggy mass, then stop mixing – the batter will come together as it bakes.
- Ingredient replacements: If you’re missing an ingredient or want to try a substitution, don’t be afraid to experiment and try new things. Some ideas might include using different types of flour, sugar, or milk, or swapping out the cream cheese for a non-dairy alternative.
- Over/undercooking signs: To ensure that your cake is cooked to perfection, keep an eye on the temperature and baking time. The ideal temperature for baking cake is between 325°F and 375°F (165°C to 190°C), and the baking time will depend on the size and depth of your cake pans. As a general rule, bake for 25-30 minutes, or until a toothpick inserted into the center of each cake comes out clean.
FAQs
- Can I freeze it? Yes, you can freeze your banana split cheesecake cake for up to 2 months. Simply wrap it tightly in plastic wrap or aluminum foil, then place it in a freezer-safe bag or container. When you’re ready to serve, simply thaw the cake overnight in the refrigerator, then top with your desired toppings and serve.
- Is it gluten-free? No, this dessert is not gluten-free, as it contains traditional flour. However, you can easily make a gluten-free version by swapping out the flour for a gluten-free alternative.
- Can I double the recipe? Yes, you can easily double or triple this recipe to make a larger cake. Simply multiply the ingredients accordingly, then bake in a larger pan or multiple smaller pans. Keep in mind that the baking time may be longer for a larger cake, so be sure to keep an eye on it and adjust the baking time as needed.
Conclusion
This banana split cheesecake cake is a true showstopper, with its moist cake layer, creamy cheesecake layer, and stunning toppings. Whether you’re a seasoned baker or a novice in the kitchen, this dessert is sure to impress your family and friends, and it’s perfect for any occasion. So go ahead, get creative, and make this dessert your own – with its endless customization options and easy preparation, you’ll be enjoying a delicious banana split cheesecake cake in no time!
two pictures of a banana split cheesecake cake with chocolate and strawberries on top
A banana split cheesecake cake with chocolate and strawberries on top, featuring a moist cake layer, a creamy cheesecake layer, and stunning toppings.
🥘 Ingredients
👩🍳 Instructions
-
1Preheat oven to 350°F (180°C). Prepare cake pans by greasing and lining with parchment paper.
-
2Mix cake batter ingredients, then divide evenly between prepared pans and smooth tops.
-
3Bake for 25-30 minutes, or until a toothpick inserted into the center of each cake comes out clean.
-
4Prepare cheesecake layer by mixing cream cheese, sour cream, eggs, and sugar until smooth.
-
5Assemble cake by placing one cake layer on a serving plate, spreading cheesecake layer over top, and adding second cake layer.
-
6Refrigerate cake for at least 30 minutes, then top with sliced bananas, strawberries, chocolate sauce, whipped cream, and chopped nuts.
-
7Serve and enjoy!